
Immutable.Place Tutorial
Learn how to use immutable.place, a collaborative pixel art project hosted on the Peercoin blockchain.

Introduction
Immutable.place is a collaborative pixel art project hosted on the Peercoin blockchain. Anyone can produce artworks on a 1000x1000 pixel canvas by spending coins to a burn address. Each pixel has 16 addresses that represent 16 colors. Colors that receive the greatest amount to their address are filled in. The resulting artworks are independently reproducible from the blockchain by querying the balance of addresses.
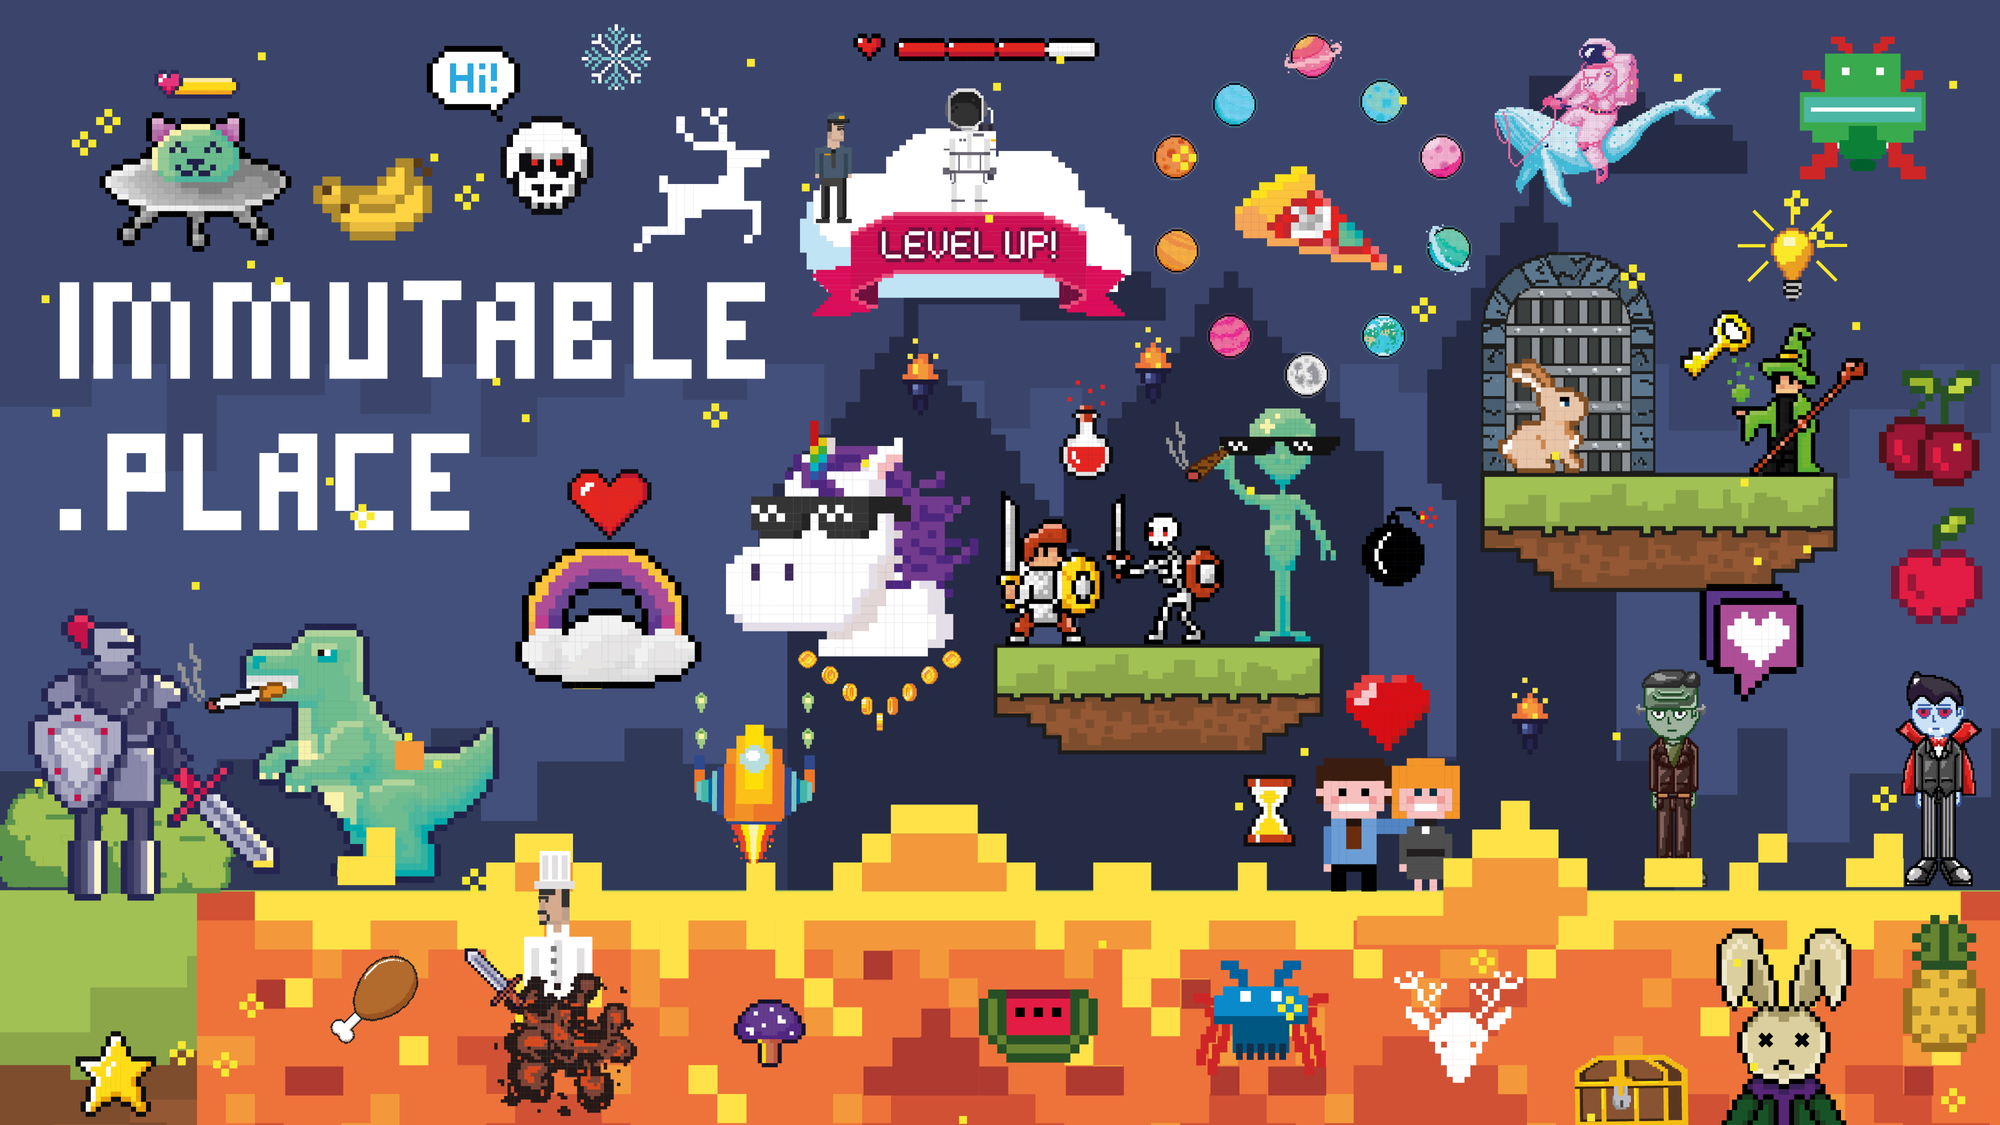
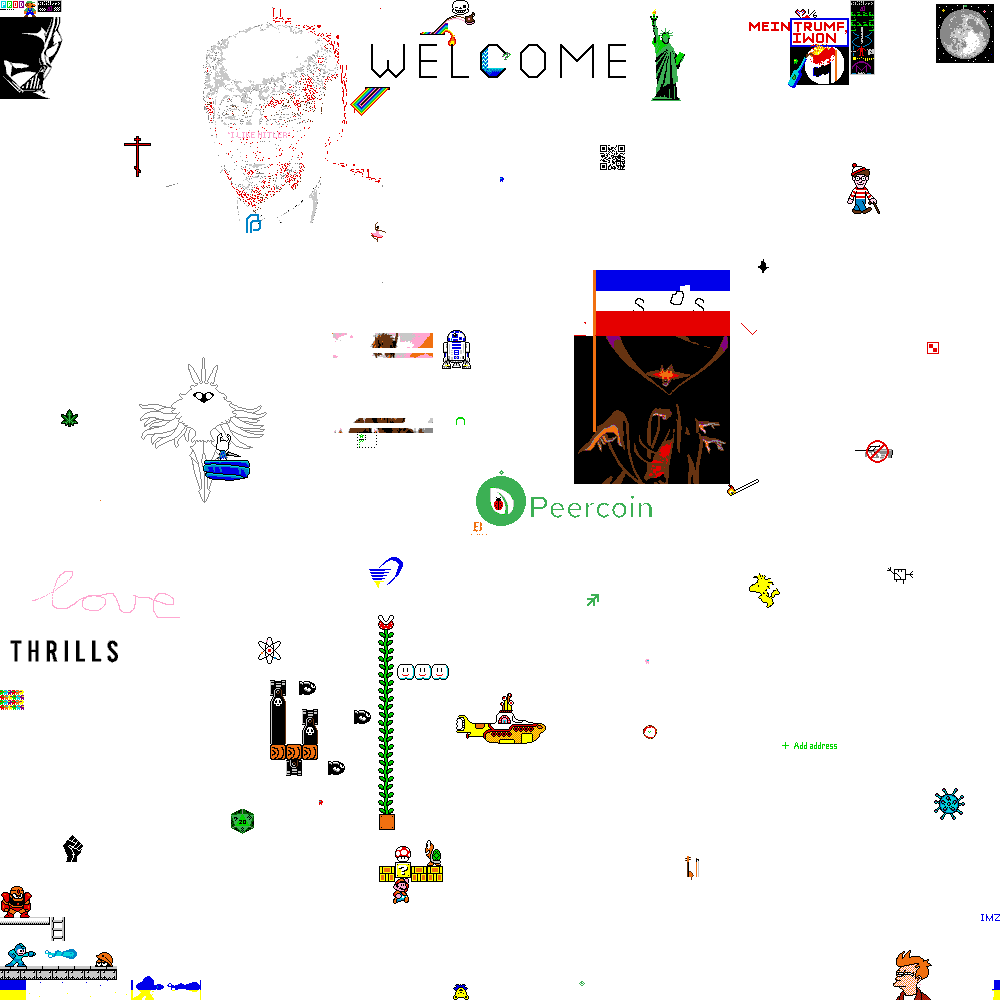
Immutable.place takes inspiration from the popular r/place by Reddit, but it takes a vastly different approach when it comes to implementation. Immutable.place is hosted directly on the Peercoin blockchain. The web app is nothing more than a window allowing you to visualize art hosted on the blockchain. Unlike r/place, immutable.place will live forever, replicated thousands of times on internet-connected computers worldwide.
Each pixel on the 1000x1000 canvas can be painted in one of 16 colors. Each color has a unique address, and pixels will be rendered in the color with the highest balance. In essence, users vote on pixel colors by sending coins to addresses. Users can outbid each other in order to "usurp" the color on a specific pixel. All coins sent to immutable.place addresses are burned, or in other words, removed from the Peercoin supply. At the time of this writing, it should cost around $0.50 cents to paint 100 pixels, as long as you are painting blank pixels and only paying the minimum fee. This will change as the price of Peercoin fluctuates of course.
A less detailed video tutorial can also be found here.
Though Immutable Place can be used on mobile browsers, it was mainly designed for use on a desktop browser. This tutorial will be written from the perspective of somebody using it on a desktop browser.
User Interface
The following image depicts the UI for Immutable Place.
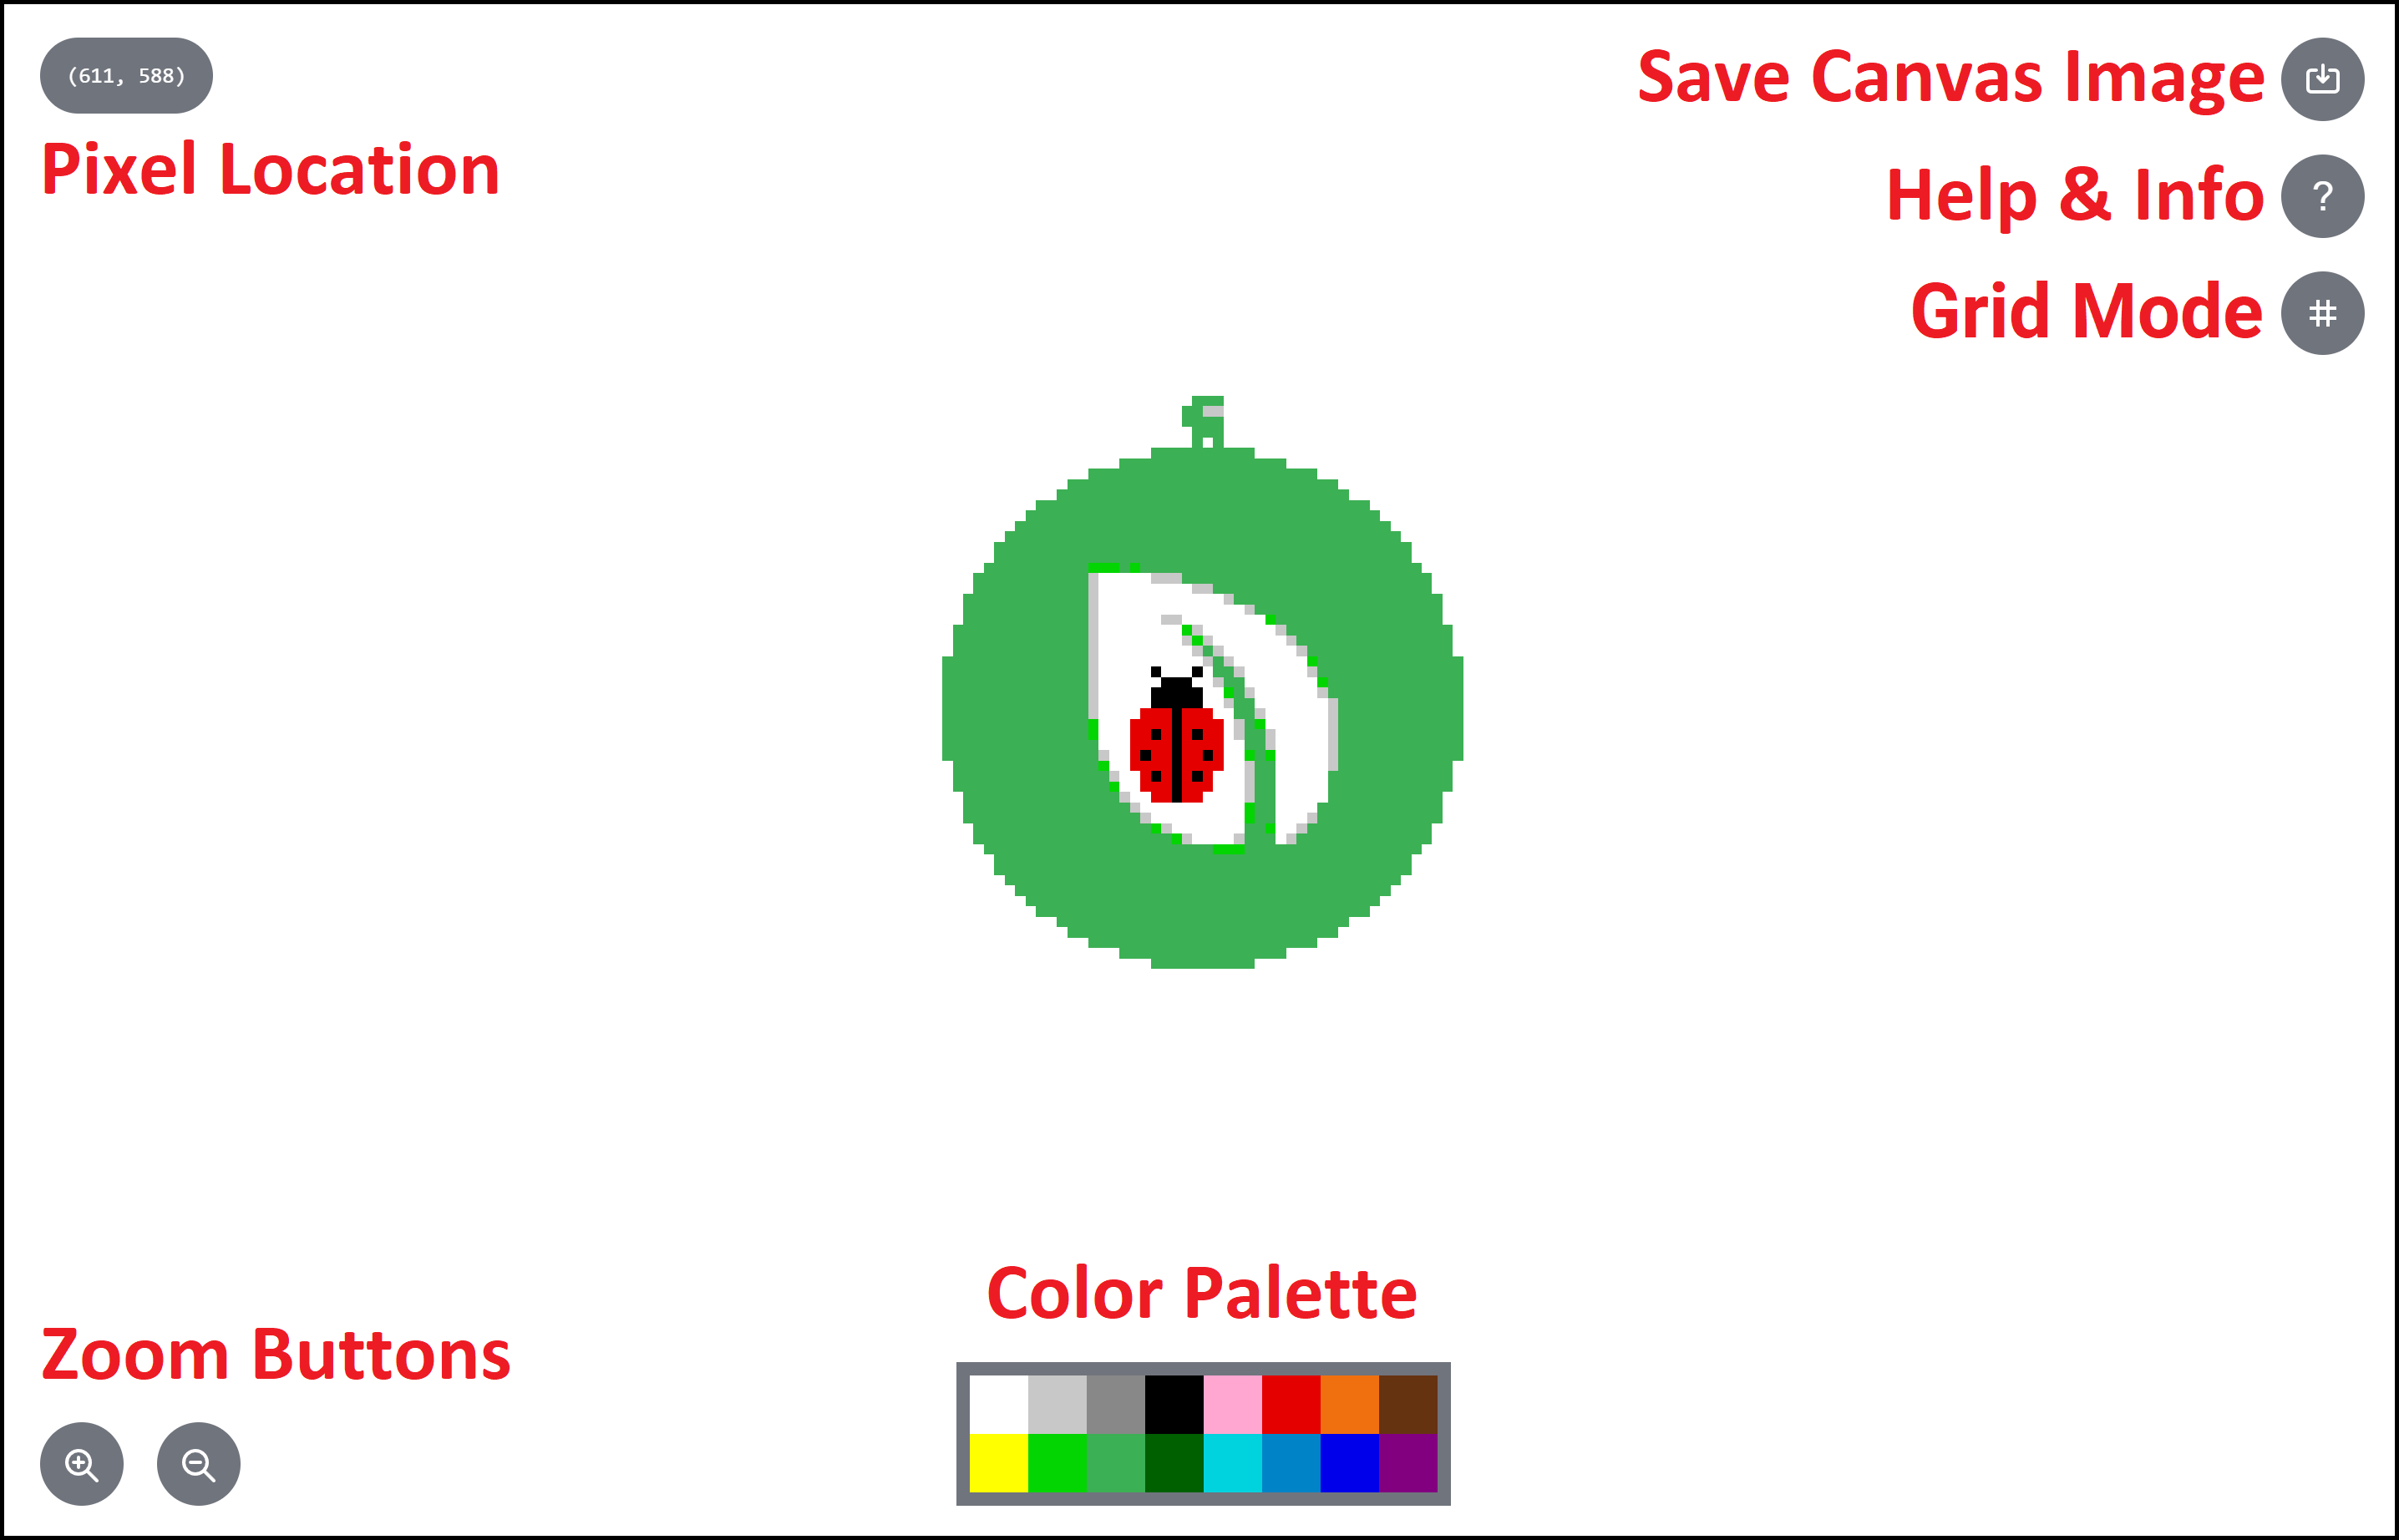
Pixel Location: The top left numbers display the location of the pixel your cursor is hovering over. The first number shows the horizontal location, while the second shows vertical location.
Zoom: The bottom left buttons are for zooming in and out of the canvas. It will be easier to select a specific pixel if you zoom in first. Zoom out if you want to get a better look at the overall canvas. You can also scroll the mouse wheel to zoom in or out or use the pinching motion on mobile devices.
Color Palette: The color palette is featured at the bottom of the screen. You can use this to select the color that you want to paint a pixel.
Save Canvas Image: The top right button will save the full canvas in the form of a 1000x1000 png image.
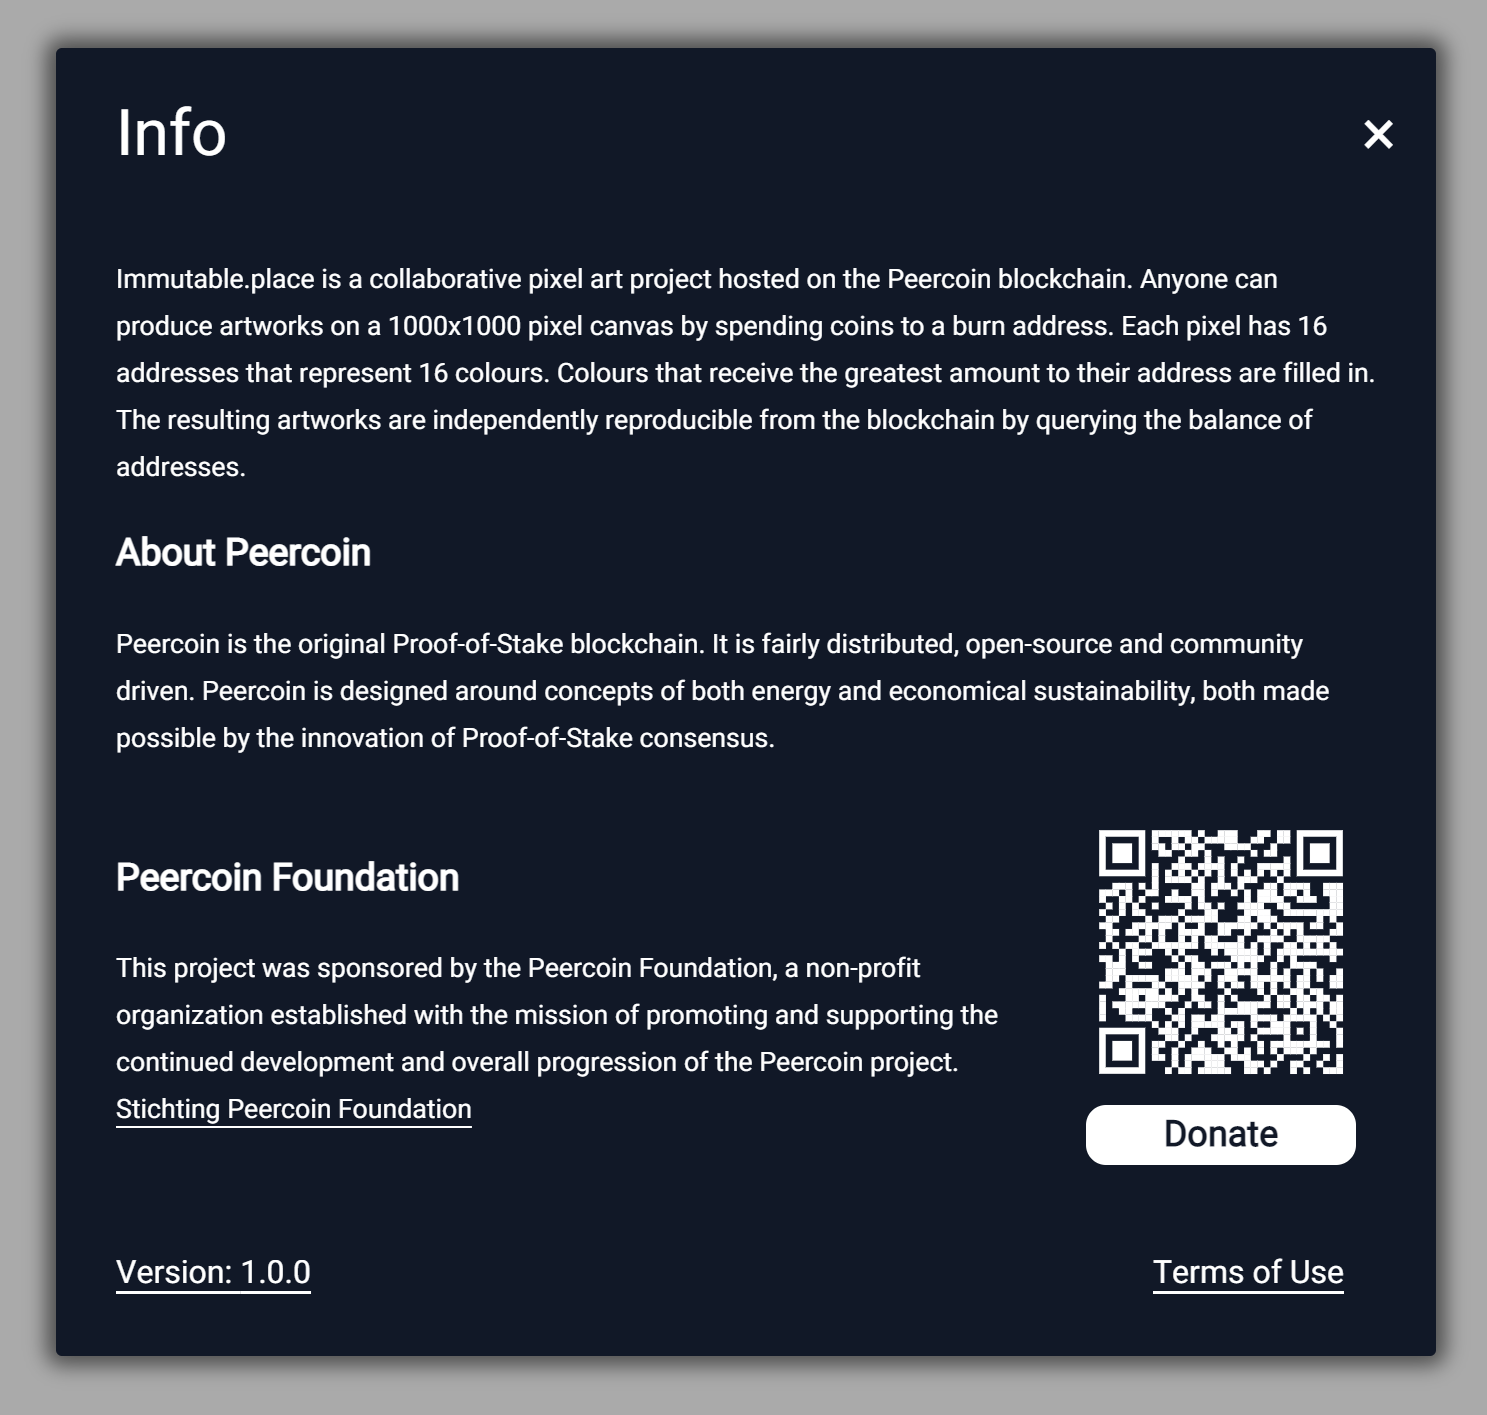
Help & Info: The button in the top right below the save canvas button is for help and information related to Immutable Place (including a link to this article), Peercoin, and a link to donate to the Peercoin Foundation (who sponsored the development of this app).
Grid Mode: The button below help & info will activate grid mode. This mode will display a grid upon zooming in, which helps the user distinguish between different pixels. It may aid users when counting pixels.

Pixel & Color Selection
You can start one of two ways. First, you can begin by selecting a specific pixel you want to paint. The following screen will then appear.
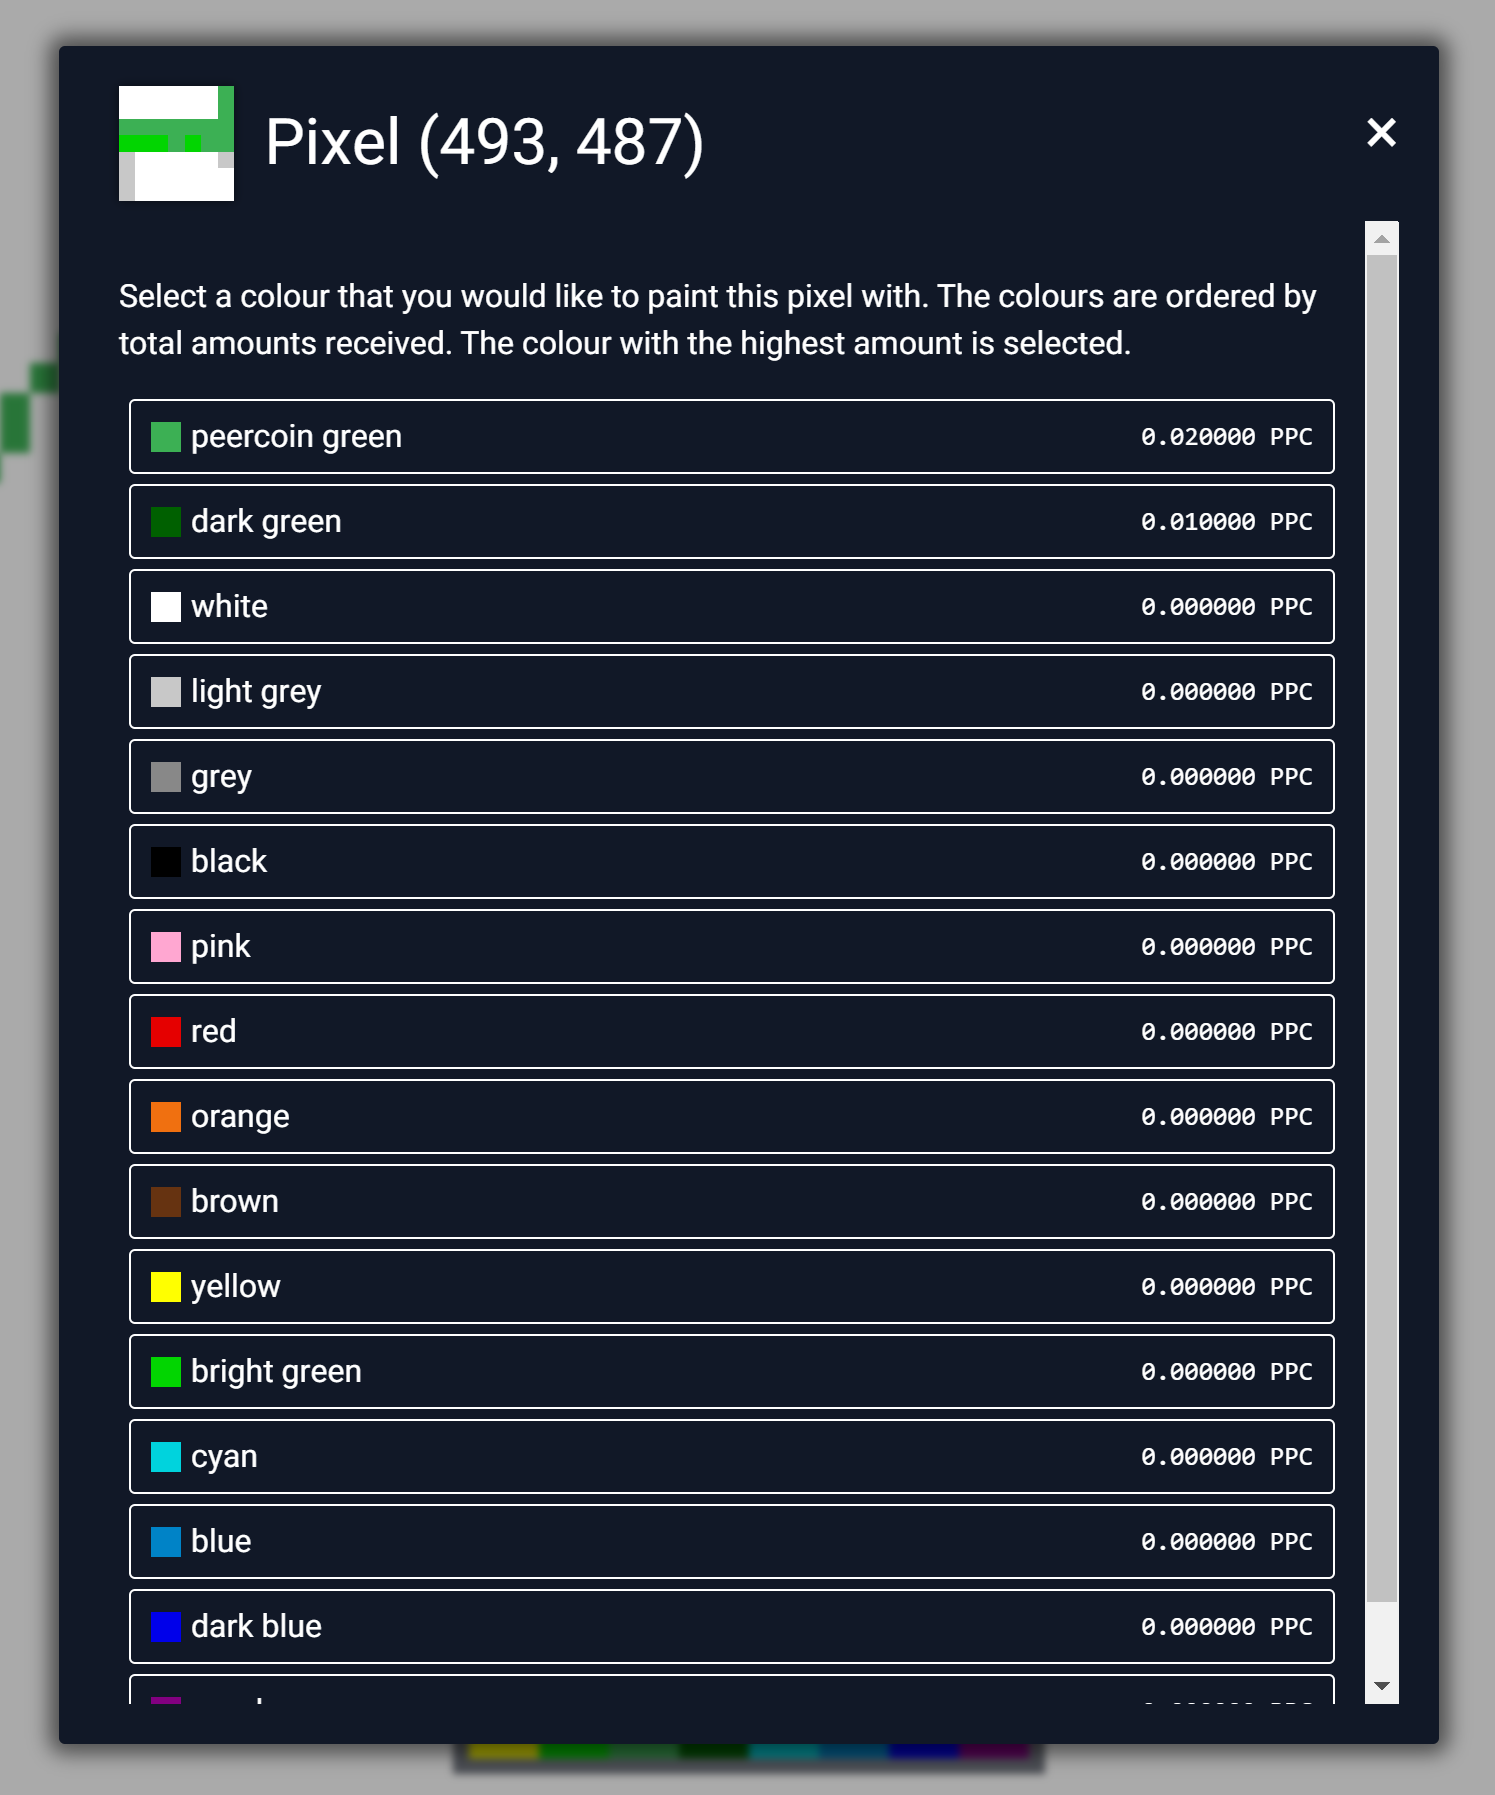
This screen will show all 16 color selections you can make. If the pixel you want to paint is currently blank, all color options will display an amount of zero PPC. If the pixel has already been painted by someone else, red for example, then red will display a non-zero amount. If you want to replace red with a color of your own choosing, then you'll need to outbid the amount associated with red. You can also use this screen to see how much PPC is already spent on other colors.
In the above example image, both dark green and peercoin green received coins to their addresses. Since peercoin green received more coins to its address (0.020000), it is displayed on the canvas. Dark green received less coin (0.010000), so it does not display on the canvas. In order for dark green to become the dominant color, someone must send more coins to the address associated with that color. If 0.010001 more PPC are sent to dark green, it will bring the total amount up to 0.020001, which is just enough to outbid peercoin green.
To continue on, select the color you want to paint the pixel and you'll be taken to the following screen.
This is the screen where you can send your payment. It should be noted however that you can arrive at this screen by another means. Instead of choosing a pixel first and then selecting the color, you can also do the opposite and bypass the color selection screen altogether. Instead, you can select a color from the palette at the bottom of the screen. The color you choose will then appear at the end of your mouse cursor and will follow the cursor around the screen until you decide where to place it. Once you choose which pixel to place that color on, you will bypass the color selection screen and go directly to the send payment screen shown above. If you make any mistakes, you can clear everything, including the selected color, by pressing the escape key.
Where to Buy Peercoin (PPC)
Now, before you can send payment to finalize your color selection, you will first need some PPC. There are a number of places where you can obtain PPC. In the screenshot above you will notice there is a link that says, "How to buy Peercoin." That link will display the info you need, but we will also list it below for your convenience.
Credit Card Purchases
Peercoin can be purchased using a credit card by using one of the following services:
Cryptocurrency Exchanges
If you already own cryptocurrency, send it to one of the following exchanges and trade it for some PPC.
DeFi
Wrapped Peercoin (wPPC) is available on both Ethereum and Polygon networks. Pixels cannot be paid for with wPPC, so you must first unwrap it. Conversion from wPPC to PPC can be done at bridge.peercoin.net. A separate video tutorial is also available if you want to learn how to use the bridging website. Contract addresses for both networks can also be found on that website, and below.
Ethereum: 0x044d078F1c86508e13328842Cc75AC021B272958
Polygon: 0x91E7E32C710661C44ae44D10Aa86135d91C3Ed65
Peercoin Wallets
You will also need to setup a Peercoin wallet, so you have a place to receive your PPC. The first three options below are preferred for newer users.
- Android
- iOS
- Web
- Peercoin Core (Capable of Minting/Staking)
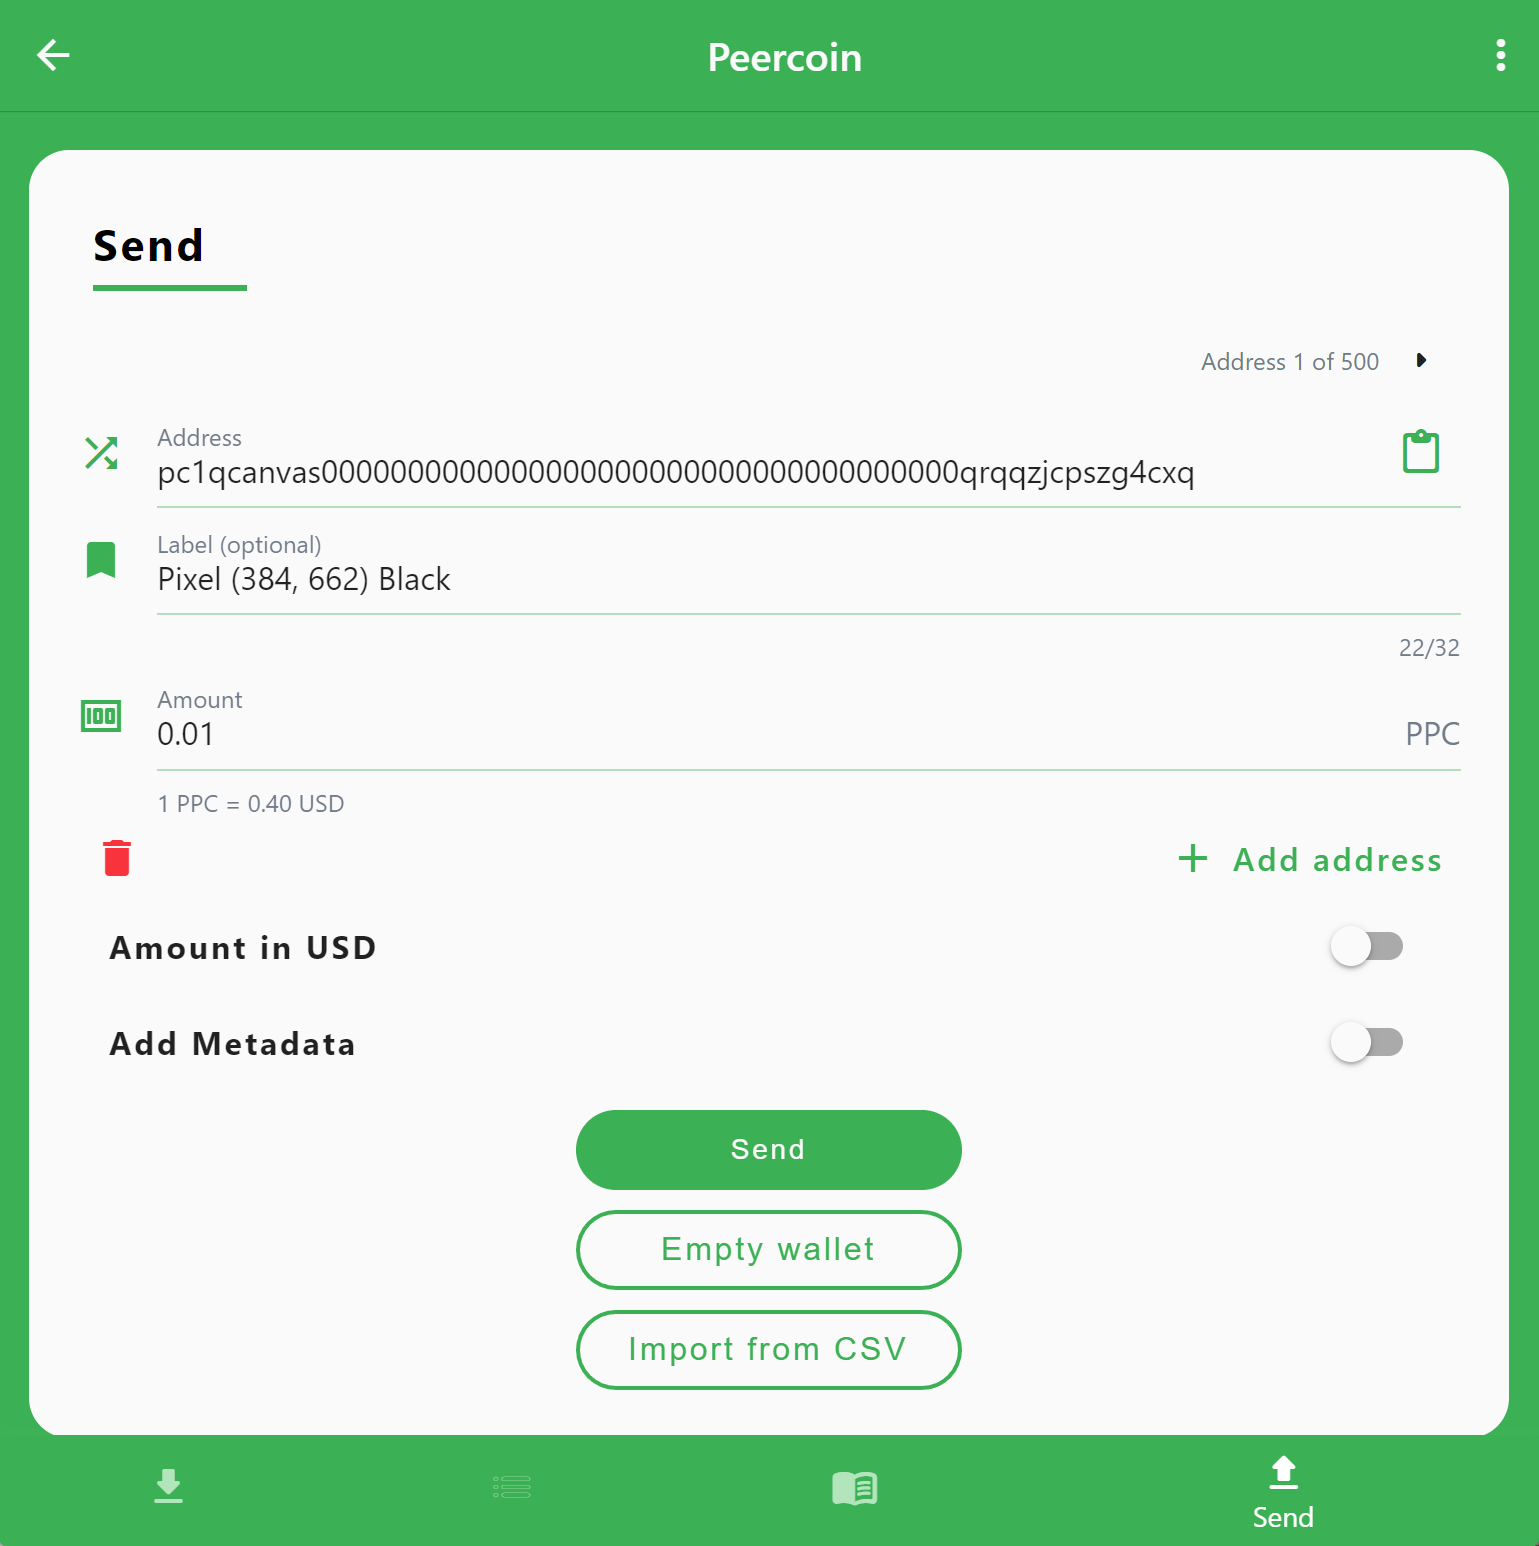
Sending Payment
Once you setup a Peercoin wallet and obtain some PPC, return to the send payment screen on Immutable Place, pictured above. You are now ready to finalize your color selection by sending payment. The required amount will show you the exact amount of PPC you need to send in order to outbid the current color. You may also send more than the required amount if you wish to make it more expensive and difficult for others to change your color selections.
We will use the mobile wallet to show the quickest and easiest way to paint pixels. You must first input the necessary info to send your PPC. The simplest way to do this is to use the scan feature on the mobile wallet at the bottom of the send screen. Simply scan the QR code on Immutable Place that appears on your desktop or laptop screen. Scanning the QR code will automatically fill out the address, label, and amount.
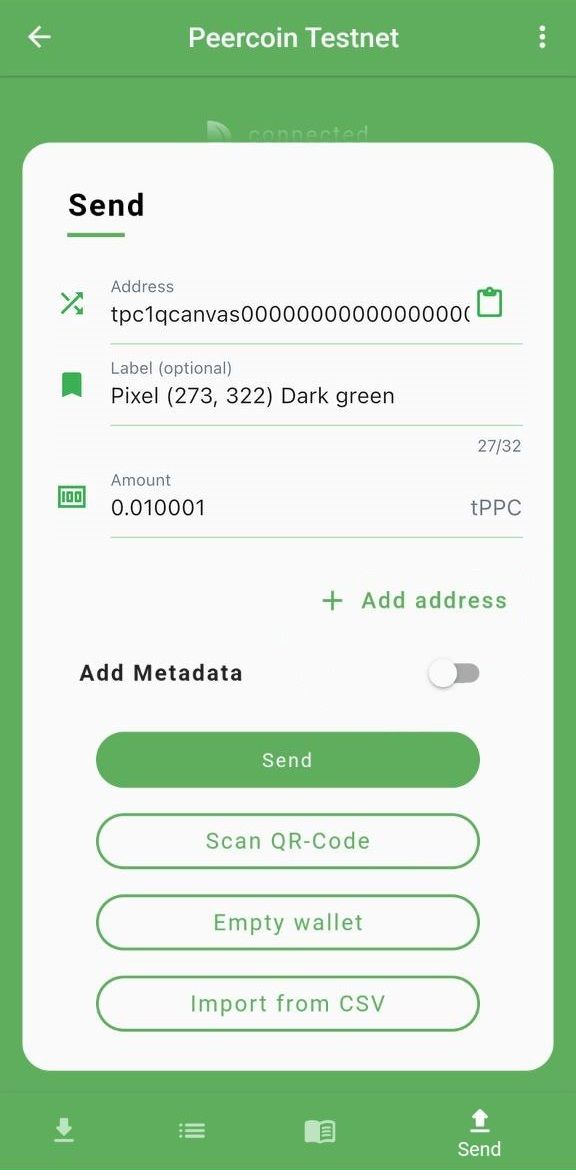
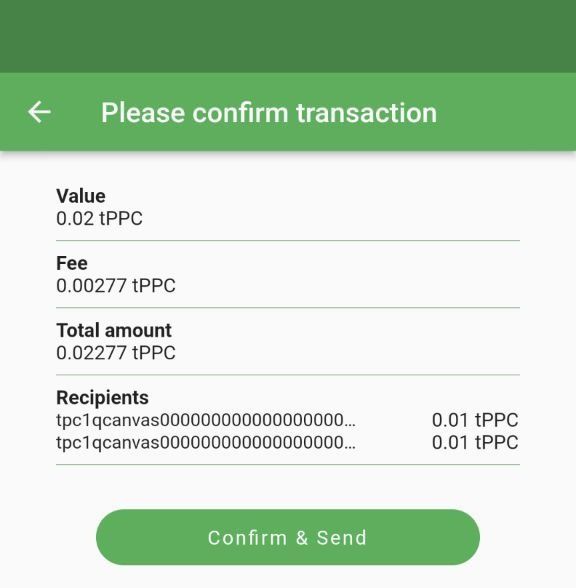
Once you are satisfied the information is entered correctly, hit send, review the transaction fee and final total, and then hit confirm & send to finish the transaction. The Peercoin network produces blocks at a rate of about 8.5 minutes per block. Once your payment makes it into the next block, your selected color will display on the canvas until someone else outbids you.
Track Your Progress
It is important to note that it's not necessary for you to wait until the next block to continue painting pixels. Once you finish sending your payment, hit the button on Immutable Place that says, "I Have Made Payment." This will take you back to the canvas, where you will see the pixel that you selected is now filled in with the color you chose. Do not be fooled by appearances though. If you reload the page, your painted pixel will vanish. It will only appear on the canvas again once your payment gets accepted into the next block, which may take a little time.
The "I Have Made Payment" button is there for you to better keep track of your progress while painting pixels. Clicking this button will leave a trail of colored pixels behind as you continue painting, that way you don't forget the locations of the pixels you've already painted. You wouldn't want to pay for the same pixel twice by accident, for example. This feature helps prevent that from happening. If it hasn't been long enough for your payments to make it into the next block, refreshing your browser will cause the trail of pixels to vanish. If it has been long enough, your pixels will remain even if you refresh the page, unless someone else has outbid you.
Multiple Payments in One Transaction
An even quicker way to paint pixels is by sending multiple payments in a single transaction. Once you have scanned the QR code using the mobile wallet, DO NOT hit send. Instead, click “I Have Made Payment” and continue to select another pixel and color.
Back on the mobile app, click “+ Add address”, to instruct the wallet about another payment to include in this transaction. Hit “Scan QR-Code” to scan payment info for the next pixel and continue repeating this process for as many pixels as you want. In this way, you can paint the entire picture you want in the same transaction, and you will save both time and transaction fees.
While painting a large design on the canvas, I personally found it easier to skip the QR code and mobile app entirely and just use desktop for everything. I opened the canvas so it took up the left side of my screen. I put an image of what I was trying to paint in the bottom right corner of the screen for reference. I had the Peercoin web wallet in the top right corner of the screen. I could paint pixels very quickly. Select a color and pixel, hit copy, hit I have made payment, click the paste icon on the web wallet to paste the address, enter the amount (0.01 if the pixel is blank), hit + add address and repeat the process by selecting a new pixel to paint. This can be done very quickly, about one pixel every 8-10 seconds.
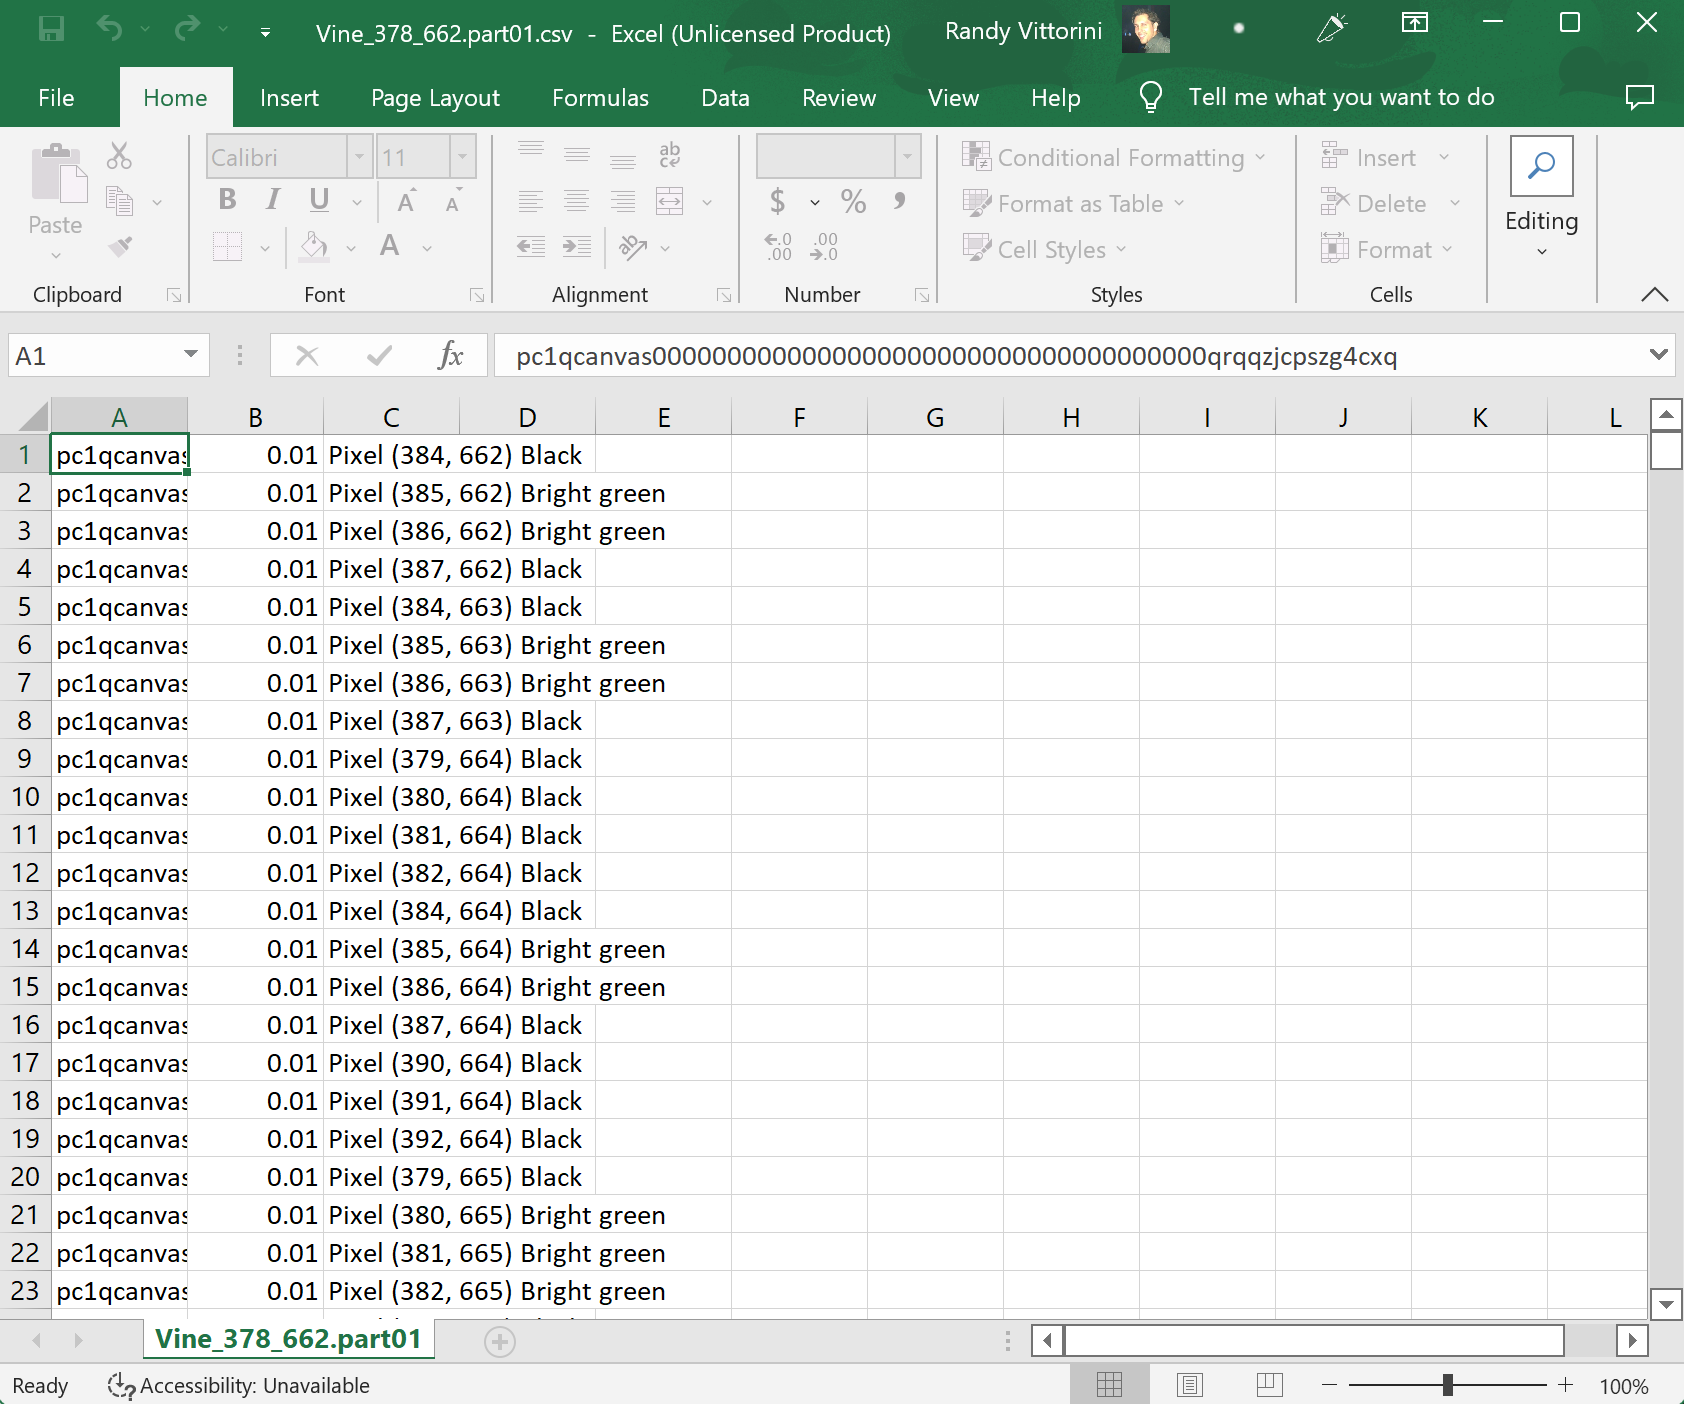
Paint Image to Canvas Using CSV File
A new feature as of December 2022 allows you to convert a 100x100 image into a CSV file, that can then be painted onto the canvas using the Peercoin Flutter wallet. This is the simplest way to paint large designs onto the canvas. It saves a lot of time, because you don't need to paint pixel by pixel. Simply load up your favorite image editor app and paint the image you want applied to the canvas.
For accuracy, it is best to use the same color palette used by Immutable Place, however this tool will also convert the colors you used in your image to the closest color in the palette. Make sure you turn transparent all the white background space in your image, or else you will end up paying fees to paint blank pixels white (unless the pixels are already painted and you want them to be white). Transparent pixels in an image will be ignored and not cost anything.
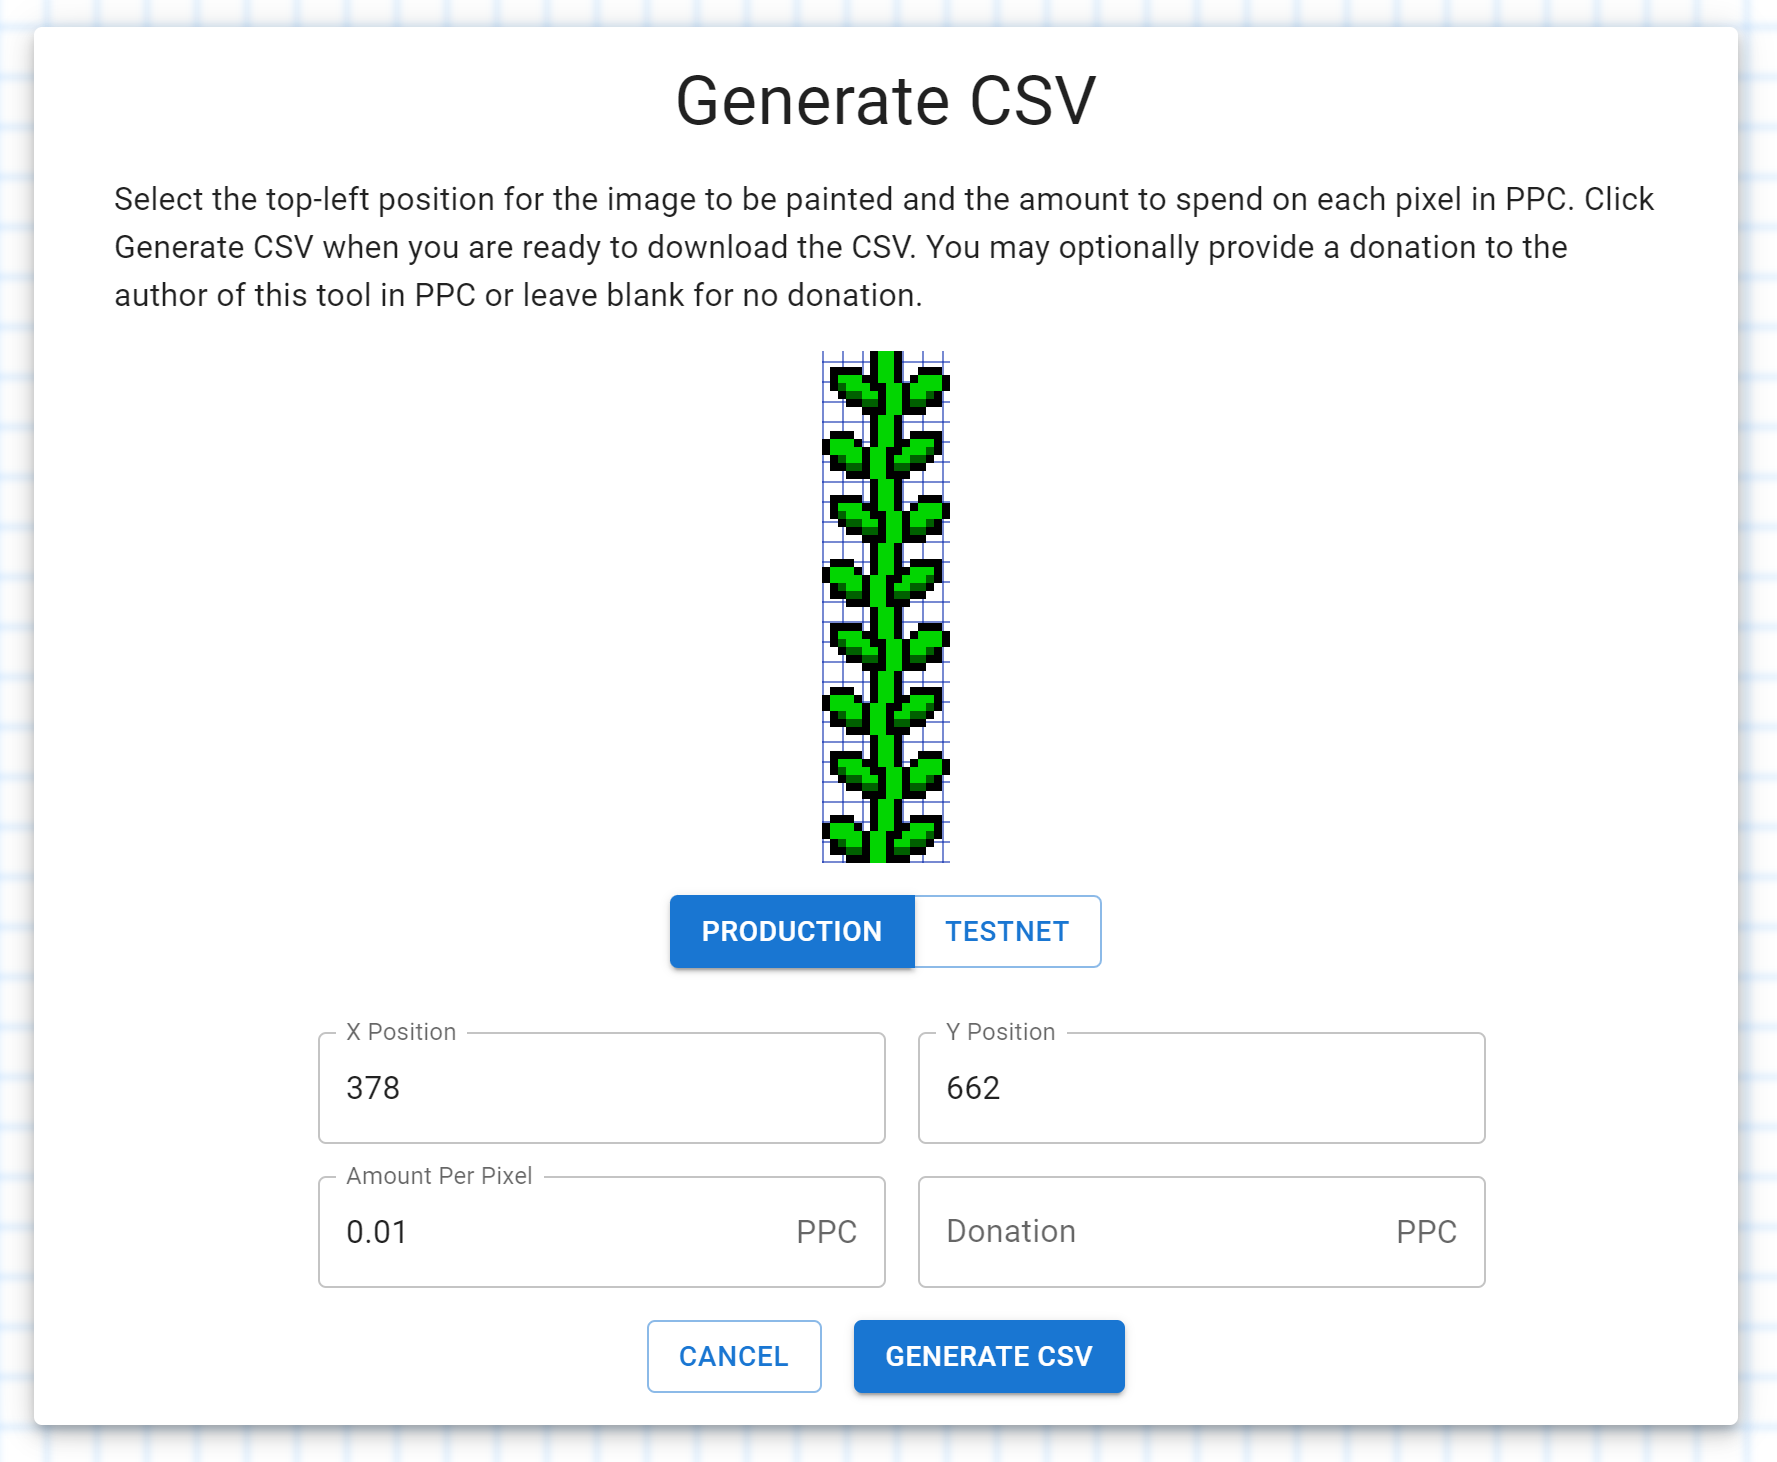
When you are finished preparing your image, go to pixelwar.art, click select file and choose the image you want to use.

After uploading, you must find the coordinates on the canvas where you want to place your image. Earlier in this tutorial we showed you where to find the pixel location. It is displayed in the top left corner of the screen. The first number is the X position, while the second number is the Y position. Whatever coordinates you select, that is where the top left portion of your image will be displayed. The image will extend right and downward from the coordinates you choose.
You must then enter the amount per pixel. For example, if your image consists of 100 pixels that need to be painted, then each of those pixels will cost the same amount, which is the amount that you enter here. If the place on the canvas you chose to host your design is currently blank, just enter the minimum fee. If the space has already been painted, you will need to increase the amount to override the existing colors.
The donation field is optional and will simply donate to the creator of this tool. Once you are finished, click generate CSV.
This will complete the process and generate the CSV file for saving.

If you open the CSV file, you will see a list of payments that must be processed in order for your image to display on the canvas. If the image you uploaded is large enough, there may be multiple CSV files. You can edit this CSV file to change amounts manually, or you can leave it alone and submit it as is.
When ready to submit, open your Peercoin Flutter app, hit send, and toward the bottom of the screen you will see a button that says Import from CSV. Hit that button and select the CSV file. This will import all the payments listed in the CSV. When finished importing all the payments, hit send, review the transaction fee and final total, and then hit confirm & send to finish the transaction.
Your image should appear on the canvas after the next block is accepted. If you have multiple CSV files, import and transact all of them to complete your image. This process can help save you many hours of manual labor.
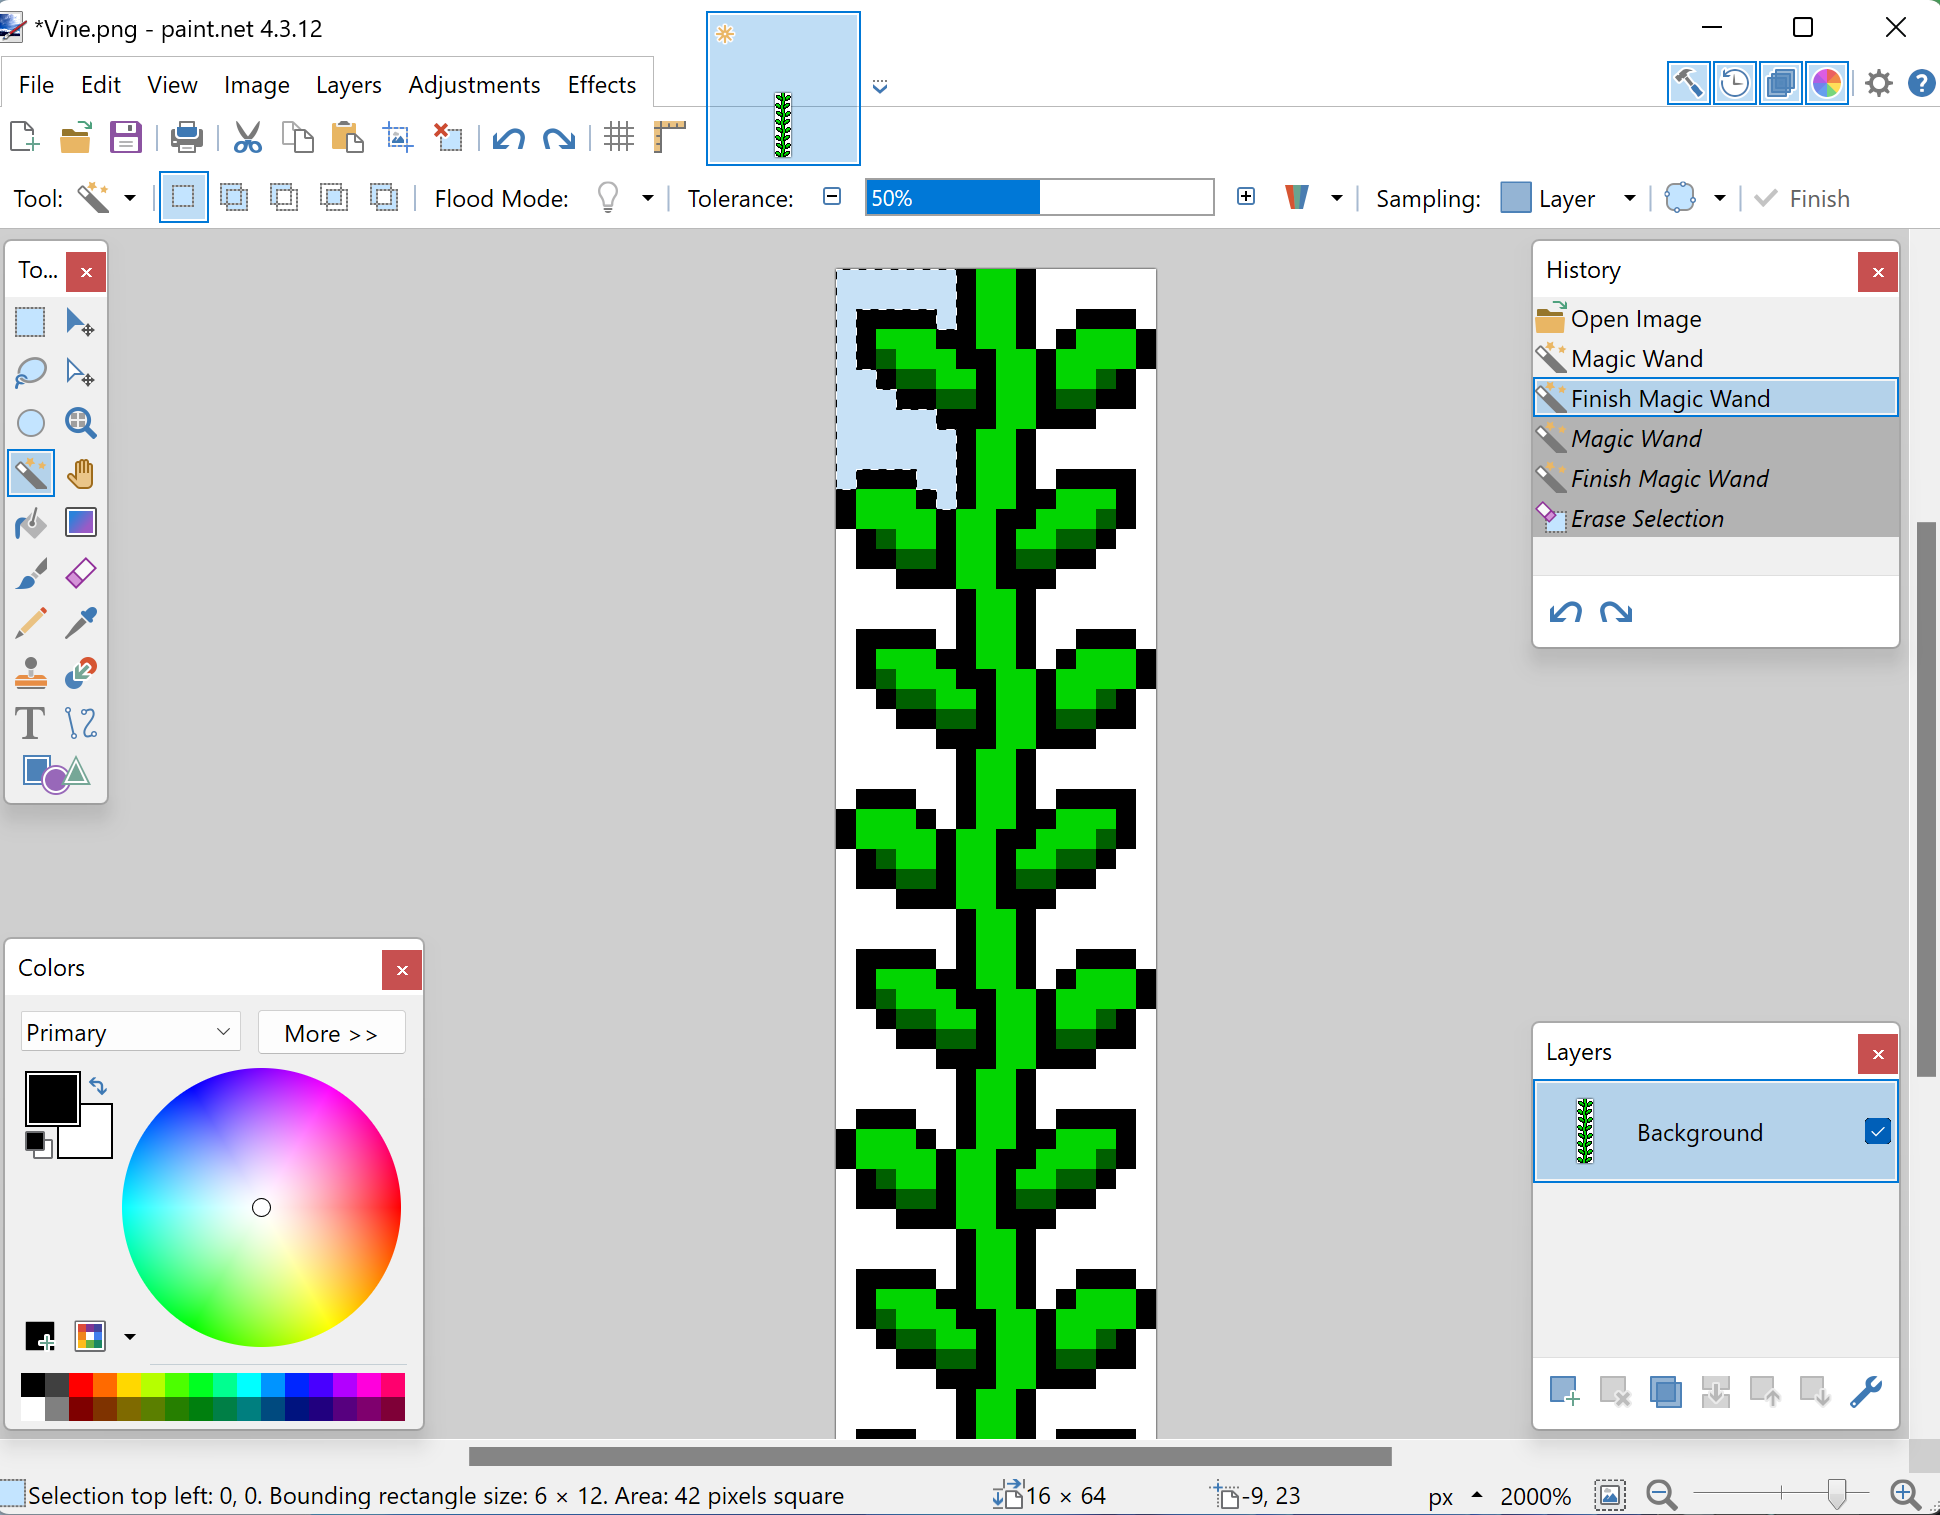
Simple Way to Make Pixels Transparent
If you would like a simple method of turning white pixels transparent in order to use the "image to CSV" tool above, search for paint.net. Open the app, load your image, select the magic wand, click on the white space in the background of your image. Doing this will select all the white space (see in the image below). If other colors besides white are selected as well, you might need to lower the tolerance at the top of the window. Once only the white space is selected, hit delete and it will make the white space transparent. Finish converting all the white space to transparent and save the file. You're now ready to make your CSV.
Organize on Peercoin's Discord
If you'd like to collaborate alongside others in the Peercoin community to design artwork on the canvas, join our Discord chat group here. There is a channel already setup called #immutableplace. Everyone is welcome, have fun!
About Peercoin
Peercoin is the original Proof-of-Stake blockchain. It is a decade old, fairly distributed, open-source and community driven project. Peercoin is designed around concepts of both energy and economical sustainability, both made possible by the innovation of Proof-of-Stake consensus.
Donate to Peercoin Foundation
The immutable.place app has been sponsored by the Peercoin Foundation. Please donate to the Foundation in order to allow us to continue supporting the Peercoin ecosystem and deliver more apps like this in the future.
https://www.peercoin.net/foundation
The Peercoin Foundation has been established with the simple mission of promoting and supporting the continued development and overall progression of the Peercoin project. We seek to empower future Peercoin team members by providing the tools necessary to perpetuate Peercoin's long-standing reputation.